


What technology can significantly enhance the ability of your application to process messages and tasks asynchronously, leading to improved performance, scalability, and reliability?
RabbitMQ, an open-source message broker, excels at handling complex data flow and communication between different parts of a system. It is a go-to solution for developers looking to streamline their applications' backend processes.
This blog post aims to demystify the process of RabbitMQ integration into your application, breaking it down into manageable steps and providing practical insights. Let’s dive in!
What is RabbitMQ?
RabbitMQ is an open-source message broker that facilitates communication between systems or applications. It implements the Advanced Message Queuing Protocol (AMQP), a standard messaging middleware protocol.
Benefits of RabbitMQ Integration
- Reliability: RabbitMQ ensures reliable message delivery even after network failures or system crashes.
- Flexibility: It supports different messaging patterns like point-to-point (P2P), publish-subscribe, and request-reply.
- Scalability: RabbitMQ can handle a large volume of messages and scale horizontally (by adding more nodes to the cluster).
- Cross-platform: It’s independent of programming languages and platforms, making it versatile for different types of applications.
- Management interface: RabbitMQ provides a user-friendly management interface for monitoring queues, connections, and exchanges.
How To Implement RabbitMQ Into Your Application? Backend Instruction
Step 1. Set up a local environment for development
Prepare your local environment by setting up a RabbitMQ instance.
For local development purposes, it's convenient to use a RabbitMQ instance running within a Docker container. Currently, a simple Docker Compose configuration will suffice.
This setup can be adjusted in the future to meet your evolving requirements.
Below is an example Docker Compose configuration in docker-compose.yml:
Step 2. Integrate RabbitMQ into your spring Java project
To integrate RabbitMQ into your Spring Java project, you need to add the necessary dependencies to your project's build management tool, such as Maven. Here's how you can do it:
- Add the required dependencies to your pom.xml file:
Testing dependencies are crucial during development to ensure the integrity and functionality of newly added features. Consider including these in your Maven configuration as well.
Next, configure the RabbitMQ connection credentials within your application's properties. This can be done by adding the necessary configuration to your application.yml (or application.properties) file, located in the resources directory of your Spring project.
As already mentioned, RabbitMQ operates with exchanges and queues, which can also be defined in the application properties.
Now, you need to create a configuration bean for RabbitMQ with the necessary exchanges and queues.
This is achieved by creating a Java class named RabbitMqConfig.java. Here's how you proceed:
Here you bind exchange and queue names to Java fields using spring annotation.
After that, create a bean for the queue, providing the queue name and durability parameter. Durability determines the behavior on restart.
You can find the necessary documentation here.
And create a bean for the exchange using the proper exchange type with the exchange name. For more information on exchange types and their differences, see documentation.
Finally, you need to declare a RabbitMQ template within your configuration, specifying essential parameters like the exchange name and message converter. In this case, we use the Jackson2Json message converter as an example. This template facilitates the efficient sending and receiving of messages through RabbitMQ in your application.
Additionally, within this same configuration, you should declare the bindings between the exchange and the queue(s), along with the routing key. Bindings act as a form of filter for messages directed to queues, ensuring that only the appropriate messages are routed according to the specified criteria.
Step 3. Using RabbitMQ in your application
Create a producer service with template and configuration beans.
We use Java class - ProducerService.java.
This is an example of sending RabbitMQ messages with a binding key.
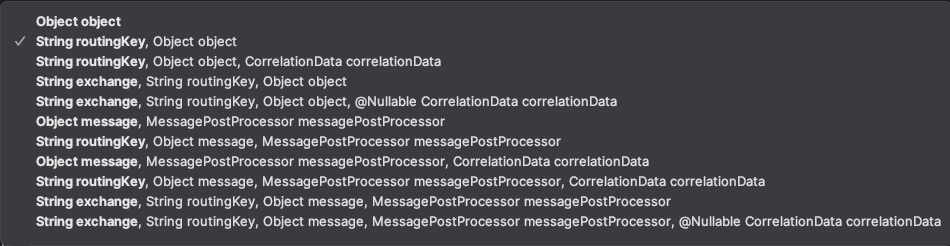
The convertAndSend method has multiple overloads. They allow for the specification of a binding key and an optional message post-processor for additional message customization.
On the receiving end, create consumer service to receive and process messages from RabbitMQ efficiently.
Java, ConsumerService.java
A critical aspect of this setup is the method marked with the ‘@RabbitListener’ annotation. This annotation allows you to define precisely which messages the service should consume, such as those from a specific queue.
Step 4. Test
For testing purposes, the producer service will emit a message on startup to test_messaging queue.
In the application console, there are two logs: one from producer and one from consumer:
INFO 72283 --- [ main] a.d.rabbittest.producer.ProducerService : sent message with text: a812d80a-4cd4-4f0e-a266-8fe39b488bd7
INFO 72283 --- [ntContainer#0-1] a.d.rabbittest.consumer.ConsumerService : received message with text: a812d80a-4cd4-4f0e-a266-8fe39b488bd7
As you can see, the second log was emitted from a different thread than the first one. This is because every message is processed asynchronously.
Further improvements
In this study case, a basic integration of RabbitMQ has been outlined. However, in a real large project, there might be different cases of uses, such as message distribution between queues in exchange and so on.
Conclusion
In conclusion, RabbitMQ integration offers a possibility for future scalability and allows the independent use of different architecture patterns. However, it's important to note some downsides:
- Complexity: Setting up and configuring a more complex RabbitMQ system can be complex, especially for users unfamiliar with messaging systems.
- Resource intensive: RabbitMQ integration requires significant resources, especially in terms of memory and CPU usage, which can impact performance in resource-constrained environments.
- Message ordering: While RabbitMQ can guarantee message delivery, it does not guarantee the order of messages, which might be an issue for certain use cases.
When it comes to RabbitMQ implementation on your project, partnering with a skilled and experienced software engineering company can be a game-changer. Experienced software engineers would bring broad expertise to the table, ensuring that your integrations are tailored to your specific requirements.
Our comprehensive services and dedicated team are here to streamline your development process, providing you with top-notch solutions while keeping a watchful eye on your budget.
.png)
Don’t hesitate to contact us to get started and receive a free consultation on how to build your software project!


